Table of Content
Its primary purpose in this project will be to program the ATtiny85 microcontrollers. The Arduino Mini could be used for the same purpose as the ATtiny85’s, but it turns out that these are much cheaper in comparison. I was thinking this when I read it, I have an old Abacus alarm in my house, it would be great to use say the dialler output pins to check it’s state from anywhere in the world. You might test the configuration of Postfix by sendmail content . Maybe you’ll need an auto logoff after X minutes, a password in the grub boot menu, or encrypt the data on the SD card. This is a vast topic, and I won’t give many details about this, but I’ll give you an example.With basic protocols, data flows in clear on the network.

There isn't an easy way to manage your Wi-Fi network on Ubuntu Server. I previously shared a tutorial on how to configure your wireless connection, but disabling it, either temporarily or... Understand everything about the Raspberry Pi, stop searching for help all the time, and finally enjoy completing your projects. I see new vulnerabilities in a lot of major software packages every day, and it could take weeks or more to have the fix available in the Raspberry Pi OS repository. To keep a good security level in your projects, try to stay constantly updated.
not send message
Select Desktop Log in as user ‘pi’ at the graphical desktop. This will enable the Raspbian OS to automatically log in as the user selected. This is a manual with the instruction on how to set up the alarm system with a Raspberry Pi. Used from the command line in the Rpi because the program is compiled with itself. The intended use for this UI is for the user to be able to push buttons according to whatever action they want to take.
Hence PIR sensors not able to detect human beings in the summer in some countries like INDIA. Once the System receives the signals, the alert about an intruder is sent to the owners device. Collecting input signal from the sensor to Raspberry pi Controller. Next up is to create and change to a virtual environment for Home Assistant Core.
Think it. Build it.
This will complete the installation for you, automatically creating the .homeassistant configuration directory in the /home/homeassistant directory, and installing any basic dependencies. Add an account for Home Assistant Core called homeassistant. Since this account is only for running Home Assistant Core the extra arguments of -rm is added to create a system account and create a home directory. The arguments -G dialout,gpio,i2c adds the user to the dialout, gpio and the i2c group.
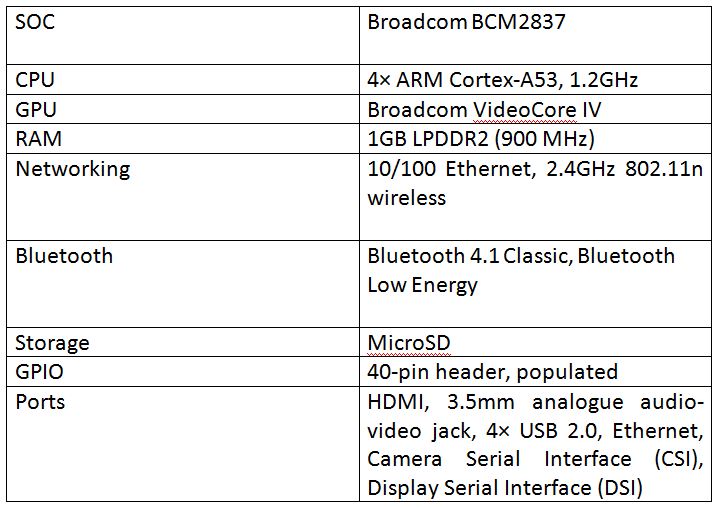
Data communications is also done via a single GPIO pin from the microcontroller. The Arduino Mini is a ATmega328 microcontroller based on the ATmega168. It comes with 14 digital I/O pins,8 analog Input Pins, 32 KB flash memory, 2 KB SRAM, and a clock speed of 16 MHz.
Introduction: Home Security System With Raspberry Pi
If you want to follow the first one, follow this guide,Manual Installation. So I made it to my use and created this awesome home automation project with OpenHAB and IFTTT. This project is meant to be very adaptable so that you can improve it with further equipment or resources. Offload a lot of computational power allowing the Raspberry Pi 1 to run the alarm system flawlessly. The project is not meant to make a difference in the field of software as there is no research done.
Once its detects the movement an alert over IoT will be generated. Sensors are implemented in the home such a way that they are not visible. These sensors will be linked to the raspberry pi processing unit. When the motion is detected by the sensor it will generate an input signal.
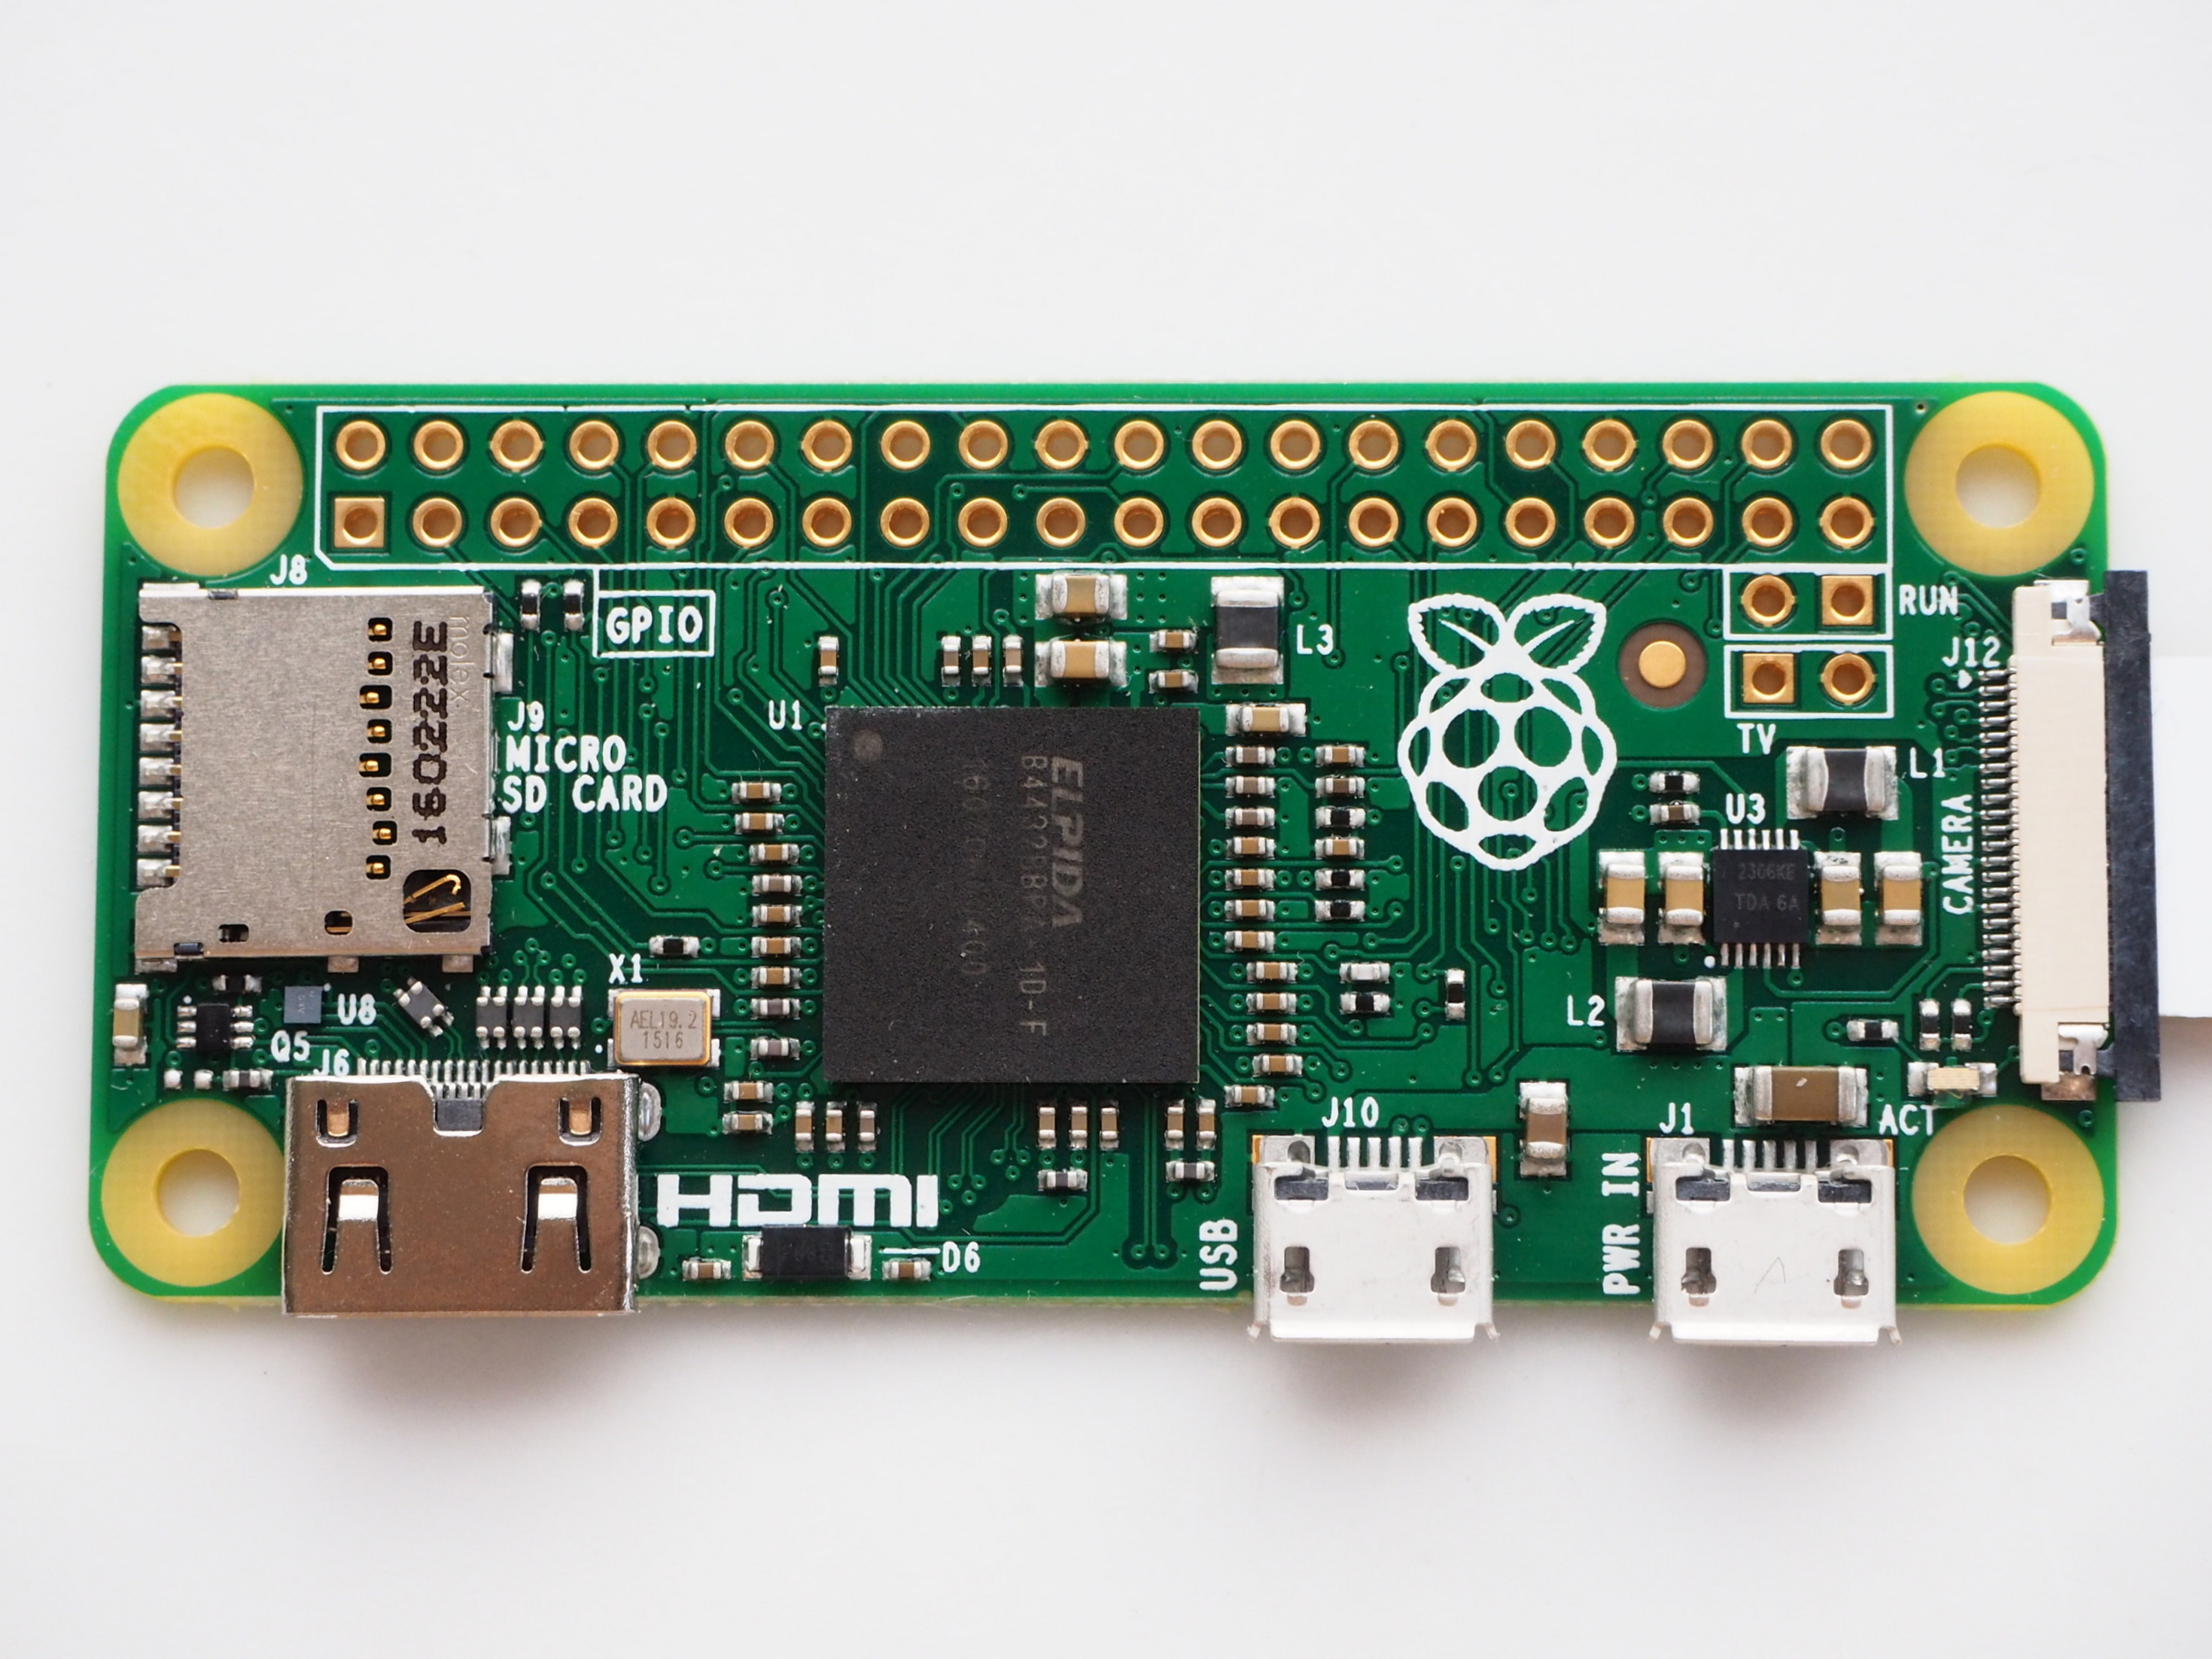
One thing to keep in mind is that the Pi by itself was just a bare board. The need of video surveillance systems are rapidly increasing in the present day. The things people want to know about their security surveillance system is whether or not they have the ability to connect to it over the internet for remote monitoring. In the past, security surveillance systems had to be viewed by a person who was locked away in a room all day monitoring the systems to make sure that nothing bad happen.
Learn more about PIR sensor here to adjust the range also check PIR sensor based Burglar alarm. Here the pictures are saved in Raspberry Pi with the name which itself contains the time and date of entry. So that we can check the time and date of intruder entry by just looking at the Picture name, check the images below. If you are new with Pi Camera then check our previous tutorial on Visitor Monitoring System with Pi Camera. A PIR sensor is used to detect the presence of any person and a Pi Camera is used to capture the images when the presence it detected. The corner regions may not be an issue in case of the switch sensors because the overall pressure on the tile is measured.
In this tutorial, we will show you how to set up a Raspberry Pi security camera with MotionEyeOS. This software works with almost any Raspberry Pi and almost any webcam or Pi camera. There’s no fancy coding to be done in this project; it just works. The system logic is the core of the project and probably the biggest part for several reasons. It ties together the graphical user interface, remote communications, RF handler. The logic is responsible for handling commands from the GUI, accepting credentials, parsing remote commands, and if time allows, extra functionalities such as system logging, and zones.

The other way was to come back and review the footage but there is chance of damage to the footage. This is an advanced installation process, and some steps might differ on your system. Considering the nature of this installation type, we assume you can handle subtle differences between this document and the system configuration you are using. When in doubt, please consider one of the other installation methods, as they might be a better fit instead. These below instructions are for an installation of Home Assistant Container running in your own container environment, which you manage yourself.
Recognition is implemented using the multi key point descriptor. This IoT based smart surveillance system is been developed with aim to design in such a way in which it can fulfil the needs of the user or an organization for particular surveillance area. Internet of things usd in the light of wire application helps to see the action and distinguished development. Computer Vision provides the face detection and is used for recognition of people which is a most fascinating kind of application for the Internet of Things. The work of sensors (i.e.) PIR sensor and IR sensor which were used in existing system can be done by using the switch sensor. Capturing Video frames and transmitting to the user over network and enabling alarm.
It will be made using a Raspberry Pi, an RF receiver, some RF transmitters. The primary purpose will be to alert the homeowners with some kind of sound and maybe push notifications to registered Android devices. It will be entirely open-source and will be released under the GNU GPL. Check out the complete python script for better understanding. The E–mail System is implemented on the Raspberry pi development board in Linux environment, which supports SMTP , TCP/IP and HTTP. The web server Flash File System supports dynamically generated files that can include output data from hardware resources.
So basically, attackers will create bots to make login attempts on this port. On Raspberry Pi, we try a lot of projects for everything, and it could be a bad habit for security. Check that everything is working correctly (ssh access, sudo, …).
This is available for commercial and open source licenses. The sensor module has on-board 3.3 V voltage regulator, protection diode, sensitivity adjustment and delay time adjust. There are three terminals on the module – ground, VCC and Digital Out. A voltage of 5V to 12 V can be supplied at the VCC pin, though 5V is the recommended power supply. When the module detects motion, the output at the Digital Out pin goes HIGH. The Digital Out pin of the sensor is connected to GPIO pins of Raspberry Pi directly to monitor signal.


No comments:
Post a Comment